On-the-Go Breakfast Burritos

Okay, I planned to post this breakfast burrito recipe today and it wasn’t until I was in the car eating the burrito that I realized I forgot to take a picture! Pardon the picture but at least I remembered to take it before it was completely devoured!

These make-ahead breakfast burritos are perfect for those on-the-go mornings, which are my typical Mondays. I typically make these up on the weekend and then freeze them. I grabbed one this morning to eat on the drive down from NH to Boston for work. They are pretty basic because I try to minimize mess while eating on the go, but they are still full of flavor and very satisfying.

Breakfast Burritos (serves 4)

4 breakfast sausage links
5 eggs
2 T milk
Dash of your favorite hot sauce
Salt and pepper to taste
1/8 t Goya adobo all purpose seasoning
1/3 c shredded cheddar
1/3 c black beans, rinsed
4 t chopped cilantro
4 flour burrito wraps

Cook breakfast sausages in a non-stick skillet per package instructions then slice into bite-sized pieces (you could also just cook up some ground breakfast sausage). Remove sausage, put aside and wipe skillet clean with a paper towel.

With a wire whisk, combine eggs, milk, hot sauce, adobo, salt and pepper in a bowl until well combined. Pour egg mixture into the same skillet used to cook the sausages and scramble over medium heat. When mixture just starts to set, add sausage, cheese and beans and continue cooking until set.

Divide egg mixture evenly between the four burrito wraps and sprinkle a teaspoon of chopped cilantro over each. To wrap, fold the top and bottom in and then roll the burrito, leaving the seam side down.

At this point, how you wrap each burrito for freezer storage really depends on how you like to cook your burritos. I prefer a crispier burrito so I wrap each of mine in tinfoil and then store all four of them in a gallon-sized bag in the freezer. When I am ready to eat one, I pull it out, remove the tinfoil (keeping it intact so I can put it back on the burrito later), and heat the burrito in a 350 degree oven for about 20 minutes. I then wrap the burrito back in the tinfoil to keep it warm for the car ride (I also wrap the tinfoil up around one end of the burrito to keep any egg mixture from leaking out of the bottom while driving).

If you’d prefer to pop the burrito in the microwave and save time, simply wrap each burrito in plastic wrap and store in a gallon-sized freezer bag. When ready to cook, remove plastic wrap, wrap burrito in a paper towel and microwave on high for about 1-1.5 minutes.

Enjoy!

What’s your favorite on-the-go breakfast meal?  I’m always looking for ideas!

A Pizza Story

Pizza is just one of those foods that will always make me feel like a kid again, no matter how fancy I try to get with it. There’s just something special about eating without utensils (yes, I will always eat pizza with my hands) that just makes it more fun.

When my husband and I first got together, we would always argue about what made a good pizza. He grew up in New York and loved the typical New York style pizza – thin (often charred) crust and, what I considered to be, sparse mozzarella cheese. I grew up in Massachusetts and was accustomed to a thicker, lightly baked corn-meal crust with gobs of ooey, gooey mozzarella cheese that made a pizza slicer a requirement and often involved wrapping the cheese around your fingers to separate once slice from the next. I ate it straight out of the box. We did both agree, though, that on both types of pizza there was always way too much outer crust.

What I like in a pizza these days differs quite a bit from what I liked back then. I still like a gooey cheese, but not gobs of it, and it’s got to be fresh mozzarella, not the shredded stuff. I’d prefer a thin crust and I don’t even mind a little bit of char. Just a little bit, though. I also like to add things to my pizza after it cooks – good olive oil, sea salt, red pepper flakes, etc. (I’ll no longer eat pizza straight out of the box!) We both still agree that the less outer crust the better and we both agree that a grilled pizza is best! It just adds a nice, crunchy, crispy texture that you just can’t get from the oven. Grilling pizza is really easy to do, and doesn’t everything taste better on the grill (almost)?

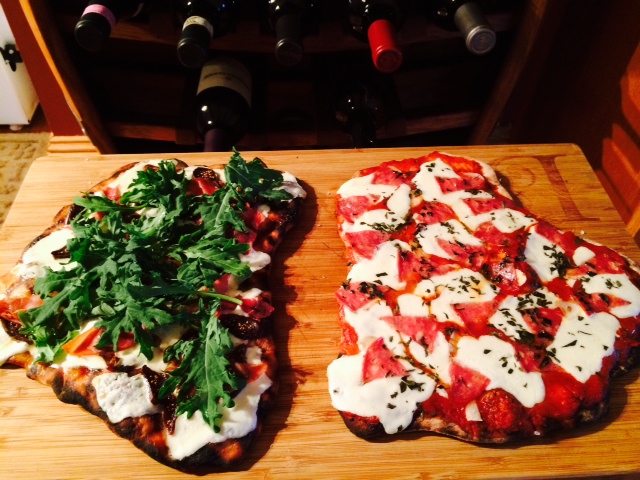
Over the weekend, since the weather was finally looking like summer, we decided to fire up the grill and make a couple of pizzas. We usually make 2… we like variety. This time we made a sopressata, garlic and oregano pizza with a red sauce and a prosciutto, fig and arugula white pizza.

Sopressata is basically a dry Italian salami. You can usually get it at a regular grocery store (either in a log form or in slices). You will also likely find it at your local meat or butcher shop.

Prosciutto is a dry-cured ham that is thinly sliced and quite delicate. There’s no need to cook it as it has cooked during the curing process, but we did cook it Ithis time. Cooking it just pumps up the flavor volume a little bit, adding a nice salty savory-ness.

For the figs, while fresh is best, dry figs are also quite delicious on a pizza and since it is what I had on hand, it’s what I used! A fig spread is also very good, especially if you aren’t used to a white, no sauce pizza as it adds a bit of the texture you might expect from a sauced pizza.

Since it was one of our “easy night” dinners, we opted for a store bought crust (Pillsbury Pizza Crust). We used one pizza crust and simply cut it in half to make 2 pizzas. Now, every time I do this my husband (the grill-master) panics thinking that each pizza will be much too small. But, every time we finish eating, he’s always full. However, if it sounds like it’s not enough for you, feel free to double up or have a side salad (which is something we also do).

The topping measurements listed below are the amount of toppings we like on our pizza. Feel free to add more or use less. Whatever works for you!

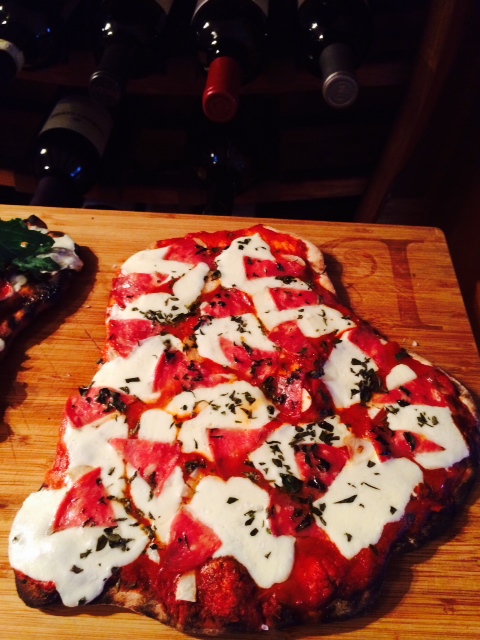
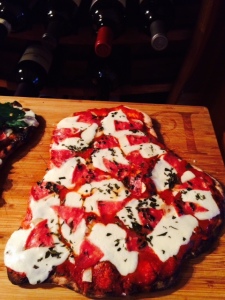
Sopressata, Garlic and Oregano Pizza

½ of a store bought pizza dough

½ cup of San Marzano crushed tomatoes (you can use whatever pizza sauce you like, but we love the texture and flavor these crushed tomatoes add to the pizza)

4-6 oz fresh mozzarella cheese, sliced

1 large garlic clove, very thinly sliced (this doesn’t cook for very long so you don’t want large, raw garlic chunks on your pizza!)

Sopressata, thinly sliced

2 teaspoons of fresh oregano

Good olive oil

Sea salt

1.  Get the grill very hot (over 450 degrees, if possible).

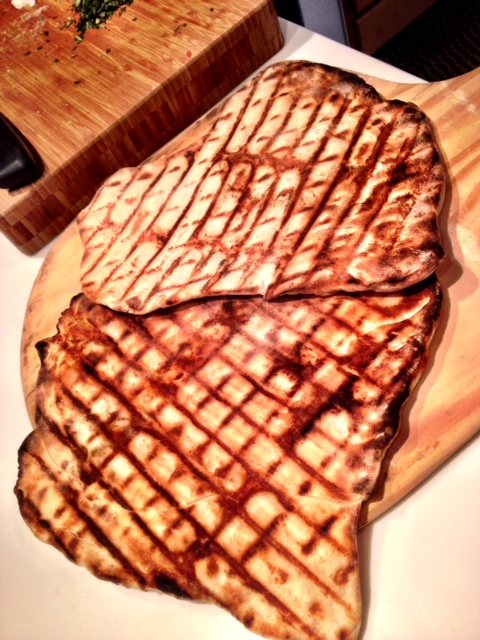
2.  Roll pizza dough out to no thinner than ¼ inch thick (you want to keep it thick enough so that it doesn’t tear on the grill rack). It doesn’t have to be a perfect circle, or even a circle at all, as you can see!

3.  Spray grill rack generously with a spray oil and make sure the grill racks are clean. Cook dough for one minute, rotate ¼ of a turn for another minute then flip the dough and cook for one minute. You want to have nice, light grill marks on the first side before taking it off of the grill to add the toppings to that side. (The side that was grilled for a shorter amount of time should be the side that goes back onto the grill racks for the final cooking stage.)

pizza 1

4.  Using a small ladle, ladle enough sauce on one crust to your liking. We like to ladle it right out to the edge of the pizza, allowing for hardly any bare crust. Next, add the cheese, garlic slices, sopressata, and oregano. Put pizza back on the grill, toppings side up, for 8-10 minutes (sometimes my husband starts it on tinfoil for a few minutes to avoid charring the crust too much). Don’t laugh, but when I once told someone that I enjoyed grilling pizza they asked how I kept the toppings on top of the pizza when I flipped it. Please don’t flip your pizza here. Toppings side up only! 🙂 You’ll know it is done when the crust is crisp and a little charred and the cheese has melted.

5.  Finish pizza off with a drizzle of good, finishing olive oil and a sprinkling of sea salt. Yum!!

 Pizza1

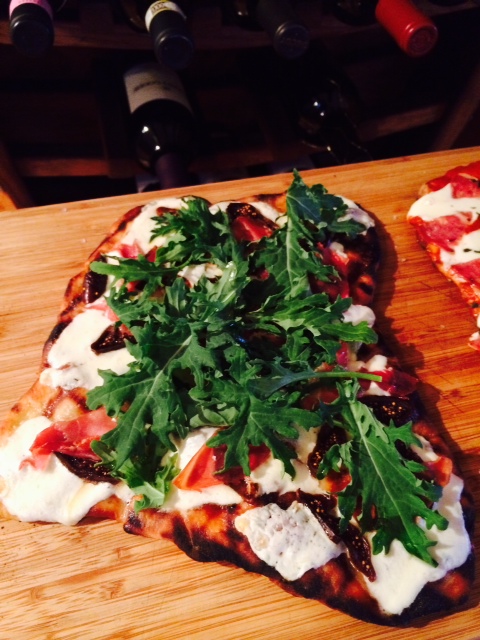
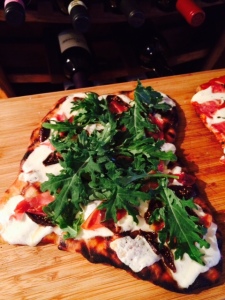
Prosciutto, Fig and Arugula Pizza

½ of a store bought pizza dough

1-2 tablespoons of olive oil

4-6 oz fresh mozzarella cheese, sliced

Figs, thinly sliced

Prosciutto

1 cup of arugula

Sea salt

Follow steps 1 and 3 above.

Brush pizza crust generously with olive oil.  Add the cheese, figs and prosciutto.  Put pizza back on the grill, toppings side up, for 8-10 minutes (again, sometimes my husband starts it on tinfoil for a few minutes to avoid charring the crust too much). The crust should be crisp and a little charred and the cheese should be melted.

Finish pizza by adding arugula over the top and a light sprinkling of sea salt.

Slice and enjoy!

Arugula

What’s your favorite style of pizza? Do you like a thin crust? Thick crust? What are your favorite toppings?


Sage Biscuits & Gravy with Ham

I do believe that a heated steering wheel is one of the greatest inventions ever! It is still COLD here in New England and my heated steering wheel was definitely a blessing in disguise this past weekend, as I ran errands and did my regular chores. And this rainy, raw weather is certainly putting me in the mood for warm and comforting food more often than not.

Enter: sage biscuits and gravy with ham. I know this was not the healthiest way to start my Sunday but I ran 6.2 miles on Saturday so that’s my excuse! 6.2 miles is FAR, and worthy of a little indulgence, in my opinion. 😉 Plus, I still had to use up that Easter ham!

This recipe will always remind me of my sister, Dawn. She used to love making what she called creamed ham and serving it over mashed potatoes. In fact, she made it so often that we nicknamed her “Ham Bone.” Sadly, I lost my sister in 1998 to cancer but creamed ham over mashed potatoes is still one of her daughter’s favorite dishes and she now makes it all the time.

The biscuits in this dish are biscuits that I make all of the time but I typically use either thyme or cheddar cheese. Both are great, and together are delicious, but I thought the sage would be a nice complement to the ham here, and the smell of the sage baking in the oven was out of this world.

This recipe makes about 8-10 biscuits, depending on size. I tend to make mine on the thinner side (mostly because I like more biscuits) so I usually end up with about 10.

Sage Biscuits & Gravy with Ham (about 4 servings)

Biscuits

2 cups of flour
1 tablespoon of baking powder
1/2 teaspoon of salt
1/2 teaspoon of cream of tartar
1/2 cup of butter (ice cold), cut into cubes
3/4 cup of milk
1 tablespoon of sage

Preheat oven to 425 degrees.

In a medium bowl, whisk together flour, baking powder, salt and cream of tartar. Cut in cold butter using a pastry cutter (or a fork) until it is the size of peas (to get flaky biscuits, always use cold butter). Make a well in the center of the mixture and add the milk and sage into the bowl. Gently mix until a soft dough forms. Roll out on a floured surface to 1/2-3/4 inch thick. Cut into circles and place on a baking sheet. I use my handy dandy egg cookers to cut the perfect sized biscuits. You could also do free form biscuits if you like a more home-style look.

Place biscuits on an ungreased baking sheet and bake for 10-12 minutes or until bottoms of biscuits are golden brown.

biscuits cutter

Gravy

2 tablespoons butter, divided
8 oz diced ham
2 tablespoons cornstarch
1 cup milk
salt
pepper

In a medium-sized skillet, melt one tablespoon of butter over medium heat. Add ham to the skillet and cook for a few minutes until brown. Remove ham from skillet and reserve. Reduce heat to medium-low, add remaining butter and cornstarch to pan, whisking for about a minute (if pan seems dry, add a little more butter). Slowly whisk in milk and bring to a simmer. Add ham, and salt and pepper to taste (remembering that ham is already salty), continue cooking for about a minute longer or until desired thickness. Pour over sliced biscuits.   Now, I admit that the photo of the biscuits and gravy does not look all that appealing but trust me, this is a meal you don’t want to miss (and yes, I really did eat this AND a side of hash browns — I may need to run another 6.2!)!

Enjoy!

Aside

Easter leftover ideas — Hash browns and ham and other great ideas!

What a crazy, busy weekend last weekend was!  Easter, Marathon Monday, family in town, and 6 adults and one teething 10 month old all living in a 900+ sq. ft. condo over the course of 3 days.  Oh, did I mention I was sick during some of that time?

We typically spend Easter weekend with family in Poughkeepsie but because my husband was running the Boston Marathon this year, we decided to host Easter in our small condo.  Luckily, the weather could not have been better — beautiful, sunny, spring-like weather — and we were able to get out a lot of the time to do some sightseeing, check out the Marathon finish line and all of the goings-on around Boylston Street, pick up my husband’s bib and, of course, eat!

Easter was another gorgeous day.  We had a wonderful brunch out at Masa in Boston, relaxed with the family on the roof-deck overlooking the city and then went back to really test out the space in the condo by having an Easter ham dinner.  It actually couldn’t have gone better. While we did have to move the love-seat into the center of the living room in order to expand the dining room table, we all fit comfortably and had a delicious meal of honey ham, cheesy scalloped potatoes (thanks, Lynn!), sweet potato pie, Caesar salad, rolls and all kinds of delightful desserts.  Probably not the best pre-marathon meal, but it was delicious, nonetheless!

Even though we had ham sandwiches the next day, and the day after that, I still had a ton of ham leftover.  I hate being wasteful and wanted to find different ways to use it up.

My first experiment was adding it to my morning hash browns and that turned out to be a very good idea!  It added a mildly sweet yet salty flavor that we really enjoyed.  I usually serve my hash browns as a side to eggs, pancakes or french toast, but today I decided to try it as a main dish with a nice, runny, sunny side up egg right on top.   You be the judge!

Hash browns and ham

4 large potatoes
6 oz cooked ham, diced
2 tablespoons of olive oil
2 tablespoons of butter
1 small onion
1/2 red bell pepper
1 teaspoon dried rosemary
1/8 teaspoon red pepper flakes
salt
pepper

To save time, I usually cook my potatoes a day ahead by placing them in a 375 degree oven for about 45 minutes. When cool, dice and then store until ready to use. You could also dice and boil the potatoes in salted water just until fork tender.

Heat oil and one tablespoon of butter in skillet over medium heat. Add onion and ham and sauté until onions are brown. Add the remaining tablespoon of butter, the potatoes, red bell pepper, rosemary and pepper flakes and then salt and pepper to taste. To get the desired crispy texture on your potatoes, don’t stir them for a good for 5-7 minutes. Using a spatula, flip the potatoes and cook for another 5-7 minutes. Continue to do this until browned on all sides (feel free to add a little more butter or oil if the pan seems dry).

Enjoy, and check back tomorrow for more great Easter leftover ideas!

P.S. In case you are wondering how the marathon went, it was one of the most memorable days of our lives. The crowd was loud and filled with spirit, it was another gorgeous day, and I could not have been prouder of my husband for running in honor of little Martin Richard, the 8 year-old boy who was killed in last year’s bombings. He is a good man!

image|AP Photo/Robert F. Bukaty

Seven-Layer Cookie Bars

I feel blessed that, although I never got to meet my mother-in law (sadly, she passed away from breast cancer before I had the honor of meeting her), I have been lucky enough to carry on some of her most scrumptious dishes. I love being able to make her pepper steak, chicken curry, raisin rice and so many other great recipes for my husband, taking him back to his carefree childhood days, and I know it means a lot to him when I make them.

I especially enjoy making his mom’s seven-layer bars and made them over the weekend. They are so quick and easy to make. The ingredients are usually already in my pantry and hardly any utensils are needed, which makes clean up a breeze! All you need is a 9×13 inch baking pan, a set of measuring cups and a small pan to melt the butter.

I have been making these bars for years. They are delicious and always a big hit just as they are, but as I have been on a mission to incorporate more coconut oil into my diet lately, this time I decided to replace the 1/4 cup of melted butter for equal amounts of coconut oil. The results were so good!! I highly recommend it (and I’m sure my mother-in-law wouldn’t mind :)). I will probably make them this way going forward.

Seven-Layer Cookie Bars

Preheat oven to 350 degrees

1/4 C melted butter
1 C graham cracker crumbs
1 can sweetened condensed milk
1 C coconut
6 oz chocolate chips
6 oz butterscotch chips
1 C chopped walnuts

Lightly spray sides of pan with cooking spray to prevent sticking. Spread melted butter to cover the bottom of a 9×13 inch baking pan. Then simply layer each ingredient in order. Take care to spread each ingredient evenly so each bar gets every bit of deliciousness.

20140413-205656.jpg.
Bake for about 25 minutes. Let cool completely before cutting. Enjoy!

Cocktail Time!

Spring has finally sprung in New England and what better way to celebrate on this gorgeous weekend than with a mouthwatering grapefruit martini on the deck. My husband is usually the bartender but I enjoy making this one myself. Freshly squeezed grapefruit is best, but store-bought juice works fine, too (and is much easier to use if making for large groups). And the best martinis are super cold. I always put my martini glass in the freezer for a couple of hours to be sure the martini stays ice cold.

Grapefruit Martini

(Makes one serving)

1/2 C grapefruit juice
1 1/2 oz vodka
1/2 oz orange liqueur
Splash of lemon juice

Fill a shaker to the rim with ice.
Measure all ingredients into the shaker.
Put the lid on the shaker and then shake for a good minute. (This sounds like a long time, but, again, it’s all about making sure it’s ice cold. I always shake with a towel wrapped around the shaker to keep my hand from freezing and just to prevent spills)
Pour into chilled martini glass and enjoy!

Chocolate Banana Soufflés

My husband is running this year’s Boston Marathon for Brigham & Women’s Hospital and in memory of Martin Richard, the little 8-year old boy who died in last year’s marathon bombings. He’s been trying to eat clean in prep for the big day (or he’s at least been talking about it :)), but is having a hard time giving up desserts (especially after burning so many calories while training). Last weekend, I stumbled upon this low fat, fabulous Chocolate Banana Soufflé recipe from eatingwell.com. Let me tell you, it is fantastic. You can really taste the bananas and you’ll have no idea that it’s low fat. I wonder how they’ll taste with peanut butter? 🙂

Chocolate Banana Soufflé

3 tablespoons sugar, plus extra for preparing souffle dishes
2 ounces semisweet chocolate, coarsely chopped (I just used semisweet chocolate chips)
2 teaspoons instant espresso powder, or instant coffee
2 teaspoons vanilla extract
1/3 cup unsweetened cocoa powder, preferably Dutch-process
3 tablespoons cornstarch
1/4 teaspoon salt
1/2 cup mashed ripe banana, (1 large)
1/4 cup packed light brown sugar
1/4 cup low fat milk
5 large egg whites
1/8 teaspoon cream of tartar
Confectioners’ sugar, for dusting

Preheat oven to 350°F. Lightly oil six 6-ounce (3/4-cup) individual souffle dishes or ramekins or coat them with nonstick spray. Dust with sugar, turning to coat, and tapping out the excess. Set aside.

Melt chocolate over barely simmering water or in the microwave. Dissolve espresso powder (or instant coffee) in vanilla in a small bowl.

Sift cocoa, cornstarch and salt into a large bowl. Add banana, brown sugar and milk, whisking to blend. Add melted chocolate and the coffee mixture and blend well.

Place egg whites in a clean, grease-free mixing bowl. Beat on low speed with an electric mixer until frothy. Add cream of tartar; increase the speed to medium and whip until soft peaks form. Gradually add the remaining 3 tablespoons sugar and beat on medium-high until the whites hold stiff, but not dry, peaks.

Whisk one-fourth of the egg whites into chocolate mixture. Gently but quickly, fold in the remaining whites with a rubber spatula. Spoon into the prepared souffle dishes or ramekins.

Bake until souffles are well puffed and browned, but still jiggle slightly when shaken, 15 to 25 minutes, or. Remove from the oven and sift a little confectioners’ sugar over the top. Serve immediately.

I love Sundays, especially when it involves pineapple, coconut cream cheese-stuffed French toast!

Sunday is probably my favorite day of the week.  Though I am usually up early anyway, it’s the only day of the week that I don’t feel like I HAVE to get up early.  Today was especially delightful because my husband woke me with coffee in bed… my brand-new beautiful king-sized pillow top bed that makes me feel like I am sleeping in the clouds (well, as much as one can feel like you are sleeping in the clouds when there’s an 11 lb dog jammed into your side like he’s holding on for dear life).  It was a beautiful morning here in New England — spring clearly (finally) in the air. We laid in the clouds for some time this morning, staring out at the lake while contemplating what the day might have in store for us while in no rush to make anything happen.
image

When hunger finally overruled laziness, I sauntered into the kitchen to see what sort of fun breakfast concoction I could make for the man who just brought me coffee in bed.  In an effort to (1) use up some leftover crushed pineapple I had in the fridge from another recipe and (2) continue to find ways in which to get us both consuming more coconut oil (both for its health benefits and because it tastes so good), I came up with pineapple, coconut and cream cheese-stuffed french toast with a delicious coconut/maple syrup.  And oh, was it devine!  It was sweet, but not too sweet (I don’t like very sweet foods for breakfast) and filling yet not too heavy.   We managed to have some leftover and I can’t wait to have it again tomorrow!

Pineapple, coconut cream cheese-stuffed french toast

8 slices of bread (I use wheat bread because it is what I had on hand — it was delicious, but you might try Challah, too)
4-oz cream cheese, softened
2 T crushed pineapple
1/2 C milk
2 large eggs
1 tsp coconut extract
1 C shredded sweetened coconut
2 T coconut oil, divided
1 T maple syrup
Confectioners sugar

In a small bowl, whisk together eggs, milk and coconut extract (if you prefer your french toast on the sweet side, try adding 1/2 teaspoon of sugar as well).

In a separate small bowl, whisk together the pineapple and cream cheese. Spread the cream cheese mixture onto each of the bread slices and then make 4 sandwiches.

On a small plate, spread the shredded coconut.

Melt 1 tablespoon of coconut oil on a griddle over medium-low heat. Dip the sandwiches in the egg mixture for a few seconds on each side and then press each side of each sandwich into the shredded coconut. Cook the sandwiches until golden brown, 2-3 minutes per side. Transfer to a plate and lightly dust with confectioners sugar.

For the syrup: In a small saucepan, melt the remaining tablespoon of coconut oil and the maple syrup over medium-low heat and melted and combined. Drizzle immediately over french toast.